This guide covers the general number porting process. Steps vary by carrier — please check with your provider for full details before initiating a transfer. Ports may fail if outstanding payments exist on your account; clear any unpaid balances first. SwitchNinja is not responsible for any service interruption or charges that may result. See our Terms of Use.
Quick answer
The port request itself usually costs nothing, and you can start the process in minutes — though total time varies by carrier, account status, and whether you're setting up eSIM or waiting for a SIM to arrive. You need two things from your current carrier: your account number and your transfer PIN. Then sign up with the new carrier and request to transfer your number — the ported line is usually deactivated once the transfer completes.
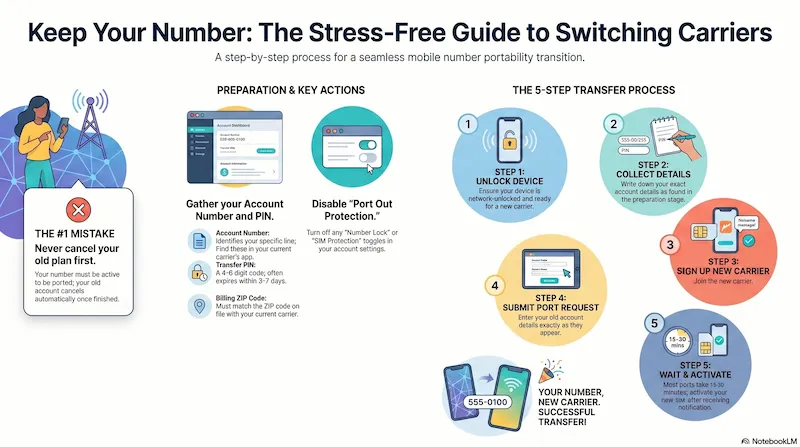
Critical: Never cancel your old plan before the transfer is done. If your number isn't active, it can't be ported. Canceling first is the mistake that causes most delays and failed transfers.
Infographic generated via NotebookLM from official carrier policy sources. Analysis by SwitchNinja Staff.
| What you need | Why it matters |
|---|---|
| Account number | Identifies your current line — find it in your carrier's app or on your bill. |
| Transfer PIN | Authorizes the port request — generate it in your carrier's app or account settings. |
| Billing name | Must match the name on your current account exactly. |
| Billing ZIP code | Must match the ZIP on file with your current carrier. |
| Unlocked phone or eSIM-ready device | Needed for your new carrier to activate service. |
The most common port failures come from mismatched account details, an incorrect transfer PIN, or an active port lock on the line.
The #1 mistake: canceling your old plan first.
Never cancel your current service before completing the switch. If your number isn't active, it can't be ported. Your old account cancels automatically once the transfer is complete.
Before you start: two things you need
1. Your account number. This is different from your phone number. Find it on your monthly bill, in your carrier's app under "Account," or by calling customer service. Takes 2 minutes to locate.
2. Your account PIN or transfer PIN. This is a 4–6 digit code used to authorize number transfers. If you don't know yours, log in to your carrier's website or app and look for "Transfer PIN" or "Number Transfer PIN" in account settings. Some carriers (like T-Mobile) let you generate a one-time transfer PIN in the app.
🔑 Timing tip
Don't request your Transfer PIN until you're ready to sign up with the new carrier right now. Transfer PINs typically expire in 3–7 days depending on your carrier (AT&T is around 4 days; T-Mobile up to 7). If it expires before you complete the switch, you'll have to generate a new one and start over.
The 5-step process
Step 1
Check that your phone is unlocked
A locked phone only works on one carrier's network. Most phones sold in the past 3 years are unlocked by default. To check: go to Settings → General → About (iPhone) or Settings → Connections → More connection settings → Network unlock (Android). If it's locked, contact your current carrier — unlock eligibility depends on the carrier's policy and your device status.
Step 2
Collect your account number and PIN from your current carrier
Log into your current carrier's app or website. Find "Account number" (on your bill) and "Transfer PIN" or "Number transfer PIN" in your account settings. Write both down — you'll need them in step 4. Also confirm your account is in good standing with no unpaid balances or suspensions — outstanding payments are the most common reason ports fail. Do NOT cancel anything yet.
One more thing: While you're in the app, check for a "Port Out Protection," "Number Lock," or "SIM Protection" toggle and make sure it's turned OFF. If this is enabled when you try to switch, the port will fail even if your PIN is correct. You can re-enable it on your new carrier after the transfer completes.
Step 3
Sign up with your new carrier
Go to the new carrier's website or app and start the signup process. When asked "Are you bringing your number?" select Yes. Most carriers will order a SIM card at this step (free with most MVNOs) or let you download an eSIM instantly to your phone.
Step 4
Enter your account number and PIN
The new carrier will ask for your current account number, your current carrier's name, your account PIN/transfer PIN, and your billing zip code. Enter these exactly as they appear on your account. This is the step where most errors happen — double-check the account number character by character.
ZIP code tip: Use the billing ZIP code on file with your current carrier — not your home address if you've moved recently. Mismatched account details (name, ZIP, account number, or PIN) are among the most common reasons ports fail.
Step 5
Wait for the port to complete
Many mobile-to-mobile ports finish in 15–30 minutes, though some take a few hours. During this time your old number still works on the old carrier. Once the port completes, you'll get a text or notification from your new carrier — activate the SIM and you're done. The ported line is usually deactivated automatically; device payment plans, trade-in credits, or remaining balances on the old account may continue separately.
After the port: Within a day or two, confirm your old account shows as closed — log in or call to verify. If you still see an active account or receive a bill, contact your old carrier directly and reference the port completion date.
Watch for these before switching
Early Termination Fees (ETFs)
If you're on a postpaid contract, check whether you owe an ETF for leaving before it ends. Most carriers eliminated ETFs years ago, but device payment plans are different — you still owe the remaining balance on your phone even after switching. (How to calculate the real cost of leaving →)
Trade-In Credit Clawback
If your current carrier gave you trade-in credit paid out monthly, switching will stop those credits. You may owe the remaining balance. Check your current agreement before you leave. (How carrier trade-in deals actually work →)
Billing Cycle Timing
Prepaid carriers don't prorate refunds. If you switch mid-cycle, you lose the unused days. Timing your switch near the end of your billing cycle saves a few dollars.
⚡ The Bottom Line
Switching is easier than most people think — and fear of losing your number isn't a reason to stay.
The port request itself usually costs nothing, and FCC number portability rules protect your right to take your number with you. The only things that typically cost money are leftover device payment balances and trade-in clawbacks — both avoidable with a quick check of your current agreement before you leave.
Deciding which carrier to switch to? See our AT&T vs T-Mobile comparison or read the T-Mobile review.